

Configure Download Clients and Applications in Prowlarr
This guide explains how to configure download clients and applications in Prowlarr.
Your service hostname, application URLs and application credentials (username and password) can be found in the Client Area under your service details.
Configure Download Clients
Go to Settings → Download Clients and enable advanced settings by clicking Show Advanced.
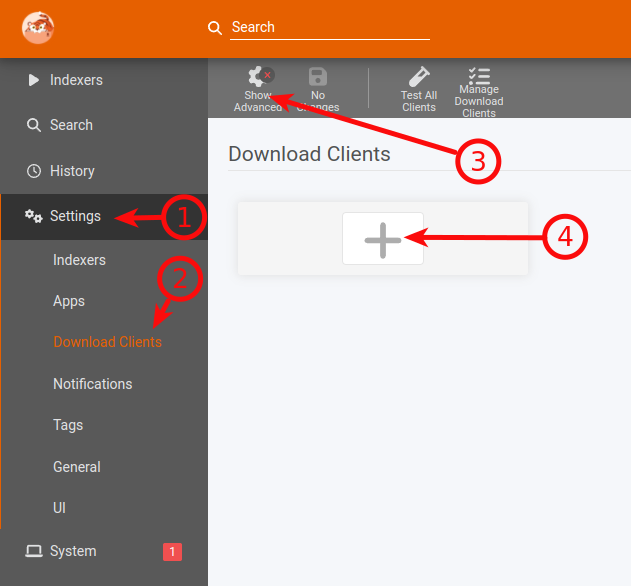
Configure rTorrent
Fill in the following fields:
- Name – choose any name you like.
- Enable – enabled.
- Host – your service hostname.
- Port – 443.
- SSL – enabled.
- Url Path –
/username/rutorrent/plugins/httprpc/action.php, where username is your service username. - Username – your ruTorrent username.
- Password – your ruTorrent password.
Scroll down and click Test. If the connection succeeds, click Save.
Configure Deluge
Fill in the following fields:
- Name – choose any name you like.
- Enable – enabled.
- Host – your service hostname.
- Port – 443.
- SSL – enabled.
- Url Base –
/username/deluge, where username is your service username. - Password – your Deluge password.
- Category – leave it empty if the Label plugin is not enabled or configured in Deluge.
Scroll down and click Test. If the connection succeeds, click Save.
Configure Transmission
Fill in the following fields:
- Name – choose any name you like.
- Enable – enabled.
- Host – your service hostname.
- Port – 443.
- SSL – enabled.
- Url Base –
/username/transmission, where username is your service username. - Username – your Transmission username.
- Password – your Transmission password.
Scroll down and click Test. If the connection succeeds, click Save.
Configure qBittorrent
Fill in the following fields:
- Name – choose any name you like.
- Enable – enabled.
- Host – your service hostname.
- Port – 443.
- SSL – enabled.
- Url Base –
/username/qbittorrent, where username is your service username. - Username – your qBittorrent username.
- Password – your qBittorrent password.
Scroll down and click Test. If the connection succeeds, click Save.
Configure NZBGet
Fill in the following fields:
- Name – choose any name you like.
- Enable – enabled.
- Host – your service hostname.
- Port – 443.
- SSL – enabled.
- Url Base –
/username/nzbget, where username is your service username. - Username – your NZBGet username.
- Password – your NZBGet password.
- Category – leave it empty if it is not configured in NZBGet.
Scroll down and click Test. If the connection succeeds, click Save.
Configure SABnzbd
Fill in the following fields:
- Name – choose any name you like.
- Enable – enabled.
- Host – your service hostname.
- Port – 443.
- SSL – enabled.
- Url Base –
/username/sabnzbd, where username is your service username. - API Key – available under SABnzbd → Config → General → Security.
- Username – your SABnzbd username.
- Password – your SABnzbd password.
- Category – leave it empty if it is not configured in SABnzbd.
Scroll down and click Test. If the connection succeeds, click Save.
Configure Applications
Go to Settings → Apps.
Configure Sonarr
Fill in the following fields:
- Name – choose any name you like.
- Enable – enabled.
- Prowlarr Server – your full Prowlarr URL.
- Sonarr Server – your full Sonarr URL.
- API Key – available under Sonarr → Settings → General → Security.
Scroll down and click Test. If the connection succeeds, click Save.
Configure Radarr
Fill in the following fields:
- Name – choose any name you like.
- Enable – enabled.
- Prowlarr Server – your full Prowlarr URL.
- Radarr Server – your full Radarr URL.
- API Key – available under Radarr → Settings → General → Security.
Scroll down and click Test. If the connection succeeds, click Save.
Configure Readarr
Fill in the following fields:
- Name – choose any name you like.
- Enable – enabled.
- Prowlarr Server – your full Prowlarr URL.
- Readarr Server – your full Readarr URL.
- API Key – available under Readarr → Settings → General → Security.
Scroll down and click Test. If the connection succeeds, click Save.
Configure Mylarr
Fill in the following fields:
- Name – choose any name you like.
- Enable – enabled.
- Prowlarr Server – your full Prowlarr URL.
- Mylarr Server – your full Mylarr URL.
- API Key – available under Mylarr → Settings → Web Interface → Enable API → Generate key. After generating the key, click Save Changes.
Scroll down and click Test. If the connection succeeds, click Save.
Configure Lidarr
Fill in the following fields:
- Name – choose any name you like.
- Enable – enabled.
- Prowlarr Server – your full Prowlarr URL.
- Lidarr Server – your full Lidarr URL.
- API Key – available under Lidarr → Settings → General → Security.
Scroll down and click Test. If the connection succeeds, click Save.
Verification
Enable Show Advanced before configuring download clients. Always use port 443 with SSL enabled where shown above. Verify the hostname, Url Base, full application URL, username, password and API Key before testing the connection.
If the connection test succeeds, click Save. Prowlarr is now configured to communicate with the selected download clients and applications.
