

How to Claim and Configure Plex Media Server
This guide explains how to claim your Plex Media Server and connect it with your Plex account.
Your Plex application details can be found in the Client Area under your service details. If Plex is already installed, it will be listed under Installed Applications.
The Plex claim code is valid for approximately 5 minutes. If the code expires, refresh the Plex claim page and generate a new one.
Method 1 – Claim Plex from the Client Area
This is the recommended and easiest method.
First, open the Plex claim page:
Log in with your Plex account. If you do not have a Plex account yet, create one first.
After logging in, you will receive a claim code starting with:
claim-XXXX
Now go to the Client Area and open your service details page.
Then:
- Go to the Apps tab.
- Find Plex on the apps list.
- Open the available management options.
- Choose the Claim option.
- Paste your Plex claim code into the pop-up window.
- Click the Claim button.
If the claim process succeeds, your Plex Media Server will be connected to your Plex account and ready to use.
If the claim code does not work, it may have expired. Go back to the Plex claim page, refresh it and copy a new claim code.
Method 2 – Claim Plex with claimplex.txt
You can also claim Plex by placing the claim code in a file named claimplex.txt inside your Plex Media Server folder.
First, open the Plex claim page:
Log in with your Plex account and copy the claim code starting with:
claim-XXXX
Next, connect to your service using FTP, SFTP or SSH.
Create a file named:
claimplex.txt
Place your Plex claim code inside this file and save it in your Plex Media Server folder.
After that, go back to the Client Area and update Plex using the Upgrade Plex Server button.
When Plex is claimed successfully, the claimplex.txt file will be removed automatically and your Plex Media Server will be ready to use.
The claim code is valid for approximately 5 minutes. If the code expires before Plex is claimed, generate a new code and try again.
Method 3 – Claim Plex from the Plex Web Interface
You can also claim Plex directly from the Plex web interface using VNC or a browser running on the server environment.
Step 1 – Open Plex Locally
Connect to your VNC service and open a web browser.
In the browser, open:
localhost:32400/web
Step 2 – Sign in to Your Plex Account
When the Plex interface loads, go to:
Settings → General
Sign in with your Plex account. If you do not have a Plex account yet, create one first.
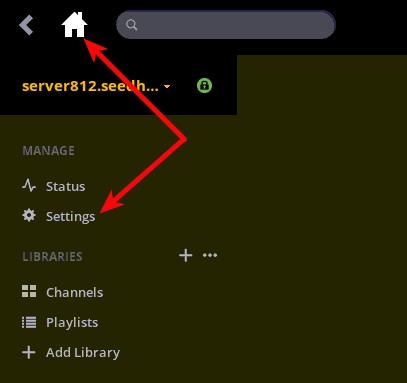
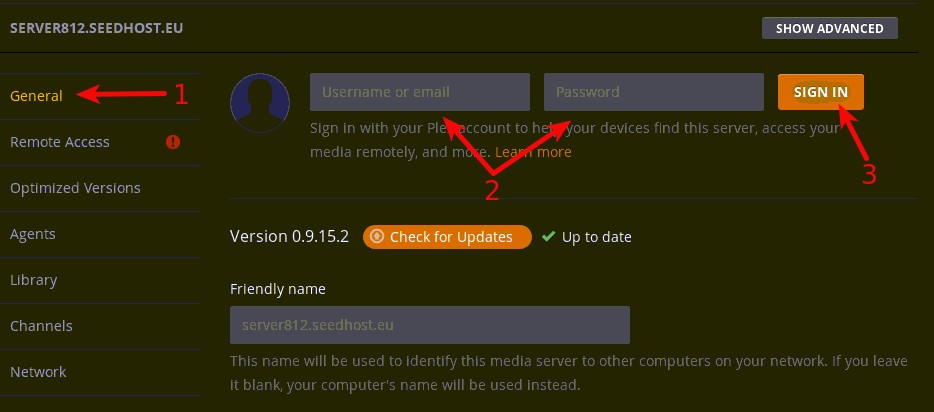
Step 3 – Configure Remote Access
After signing in to your Plex account, go to the Remote Access section.
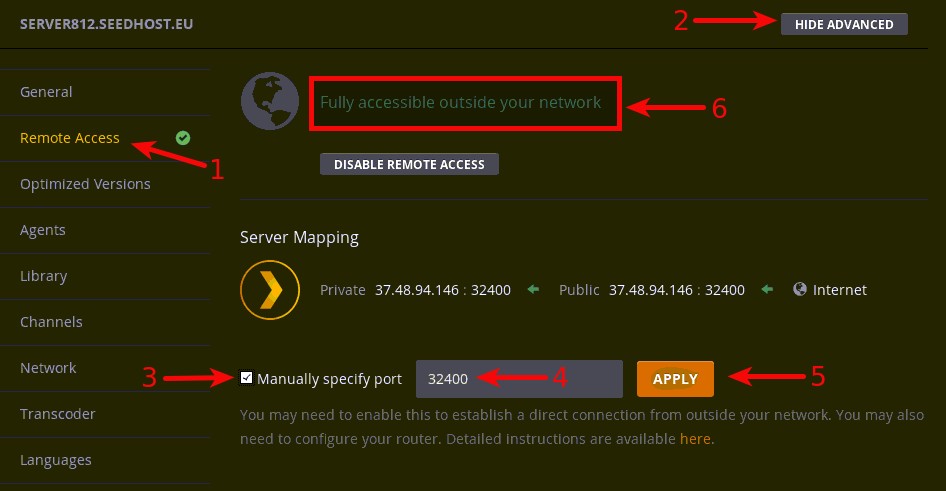
Then configure Remote Access:
- Click Remote Access.
- Click Show Advanced.
- Enable Manually specify public port.
- Enter port 32400.
- Apply the configuration.
If the configuration succeeds, Plex should show:
Fully accessible outside your network
If Plex does not become accessible outside your network after applying the configuration, please open a support ticket.
Access Plex After Configuration
After Plex is claimed and Remote Access is configured, you can access Plex from your browser using:
http://server.seedhost.eu:32400/web
Replace server.seedhost.eu with your actual service hostname.
You can also access your Plex Media Server from your Plex account on supported devices and apps.
Verification
If Plex is linked to your Plex account and shows as accessible, your Plex Media Server is ready to use.
