

Configure OpenVPN
This guide explains how to configure OpenVPN on your device.
Before configuring OpenVPN on your device, install OpenVPN from the Apps section in the Client Area.
Download the OpenVPN Configuration File
First, download the OpenVPN configuration file from the Client Area.
To do this:
- Log in to the Client Area.
- Open your service details page.
- Find OpenVPN in the installed apps list.
- Click the Download File button for OpenVPN.
In the installed OpenVPN app row, the button is shown as a download icon:
Download File
This will download the OpenVPN configuration file:
openvpn.ovpn
The downloaded openvpn.ovpn file contains the configuration required to connect to your VPN service.
Windows, iOS and Android
Step 1 – Install OpenVPN Connect
Windows – download and install OpenVPN Connect from:
https://openvpn.net/client/client-connect-vpn-for-windows
iOS – install OpenVPN Connect from the App Store or from:
https://apps.apple.com/us/app/openvpn-connect-openvpn-app/id590379981
Android – install OpenVPN Connect from Google Play Store or from:
https://play.google.com/store/apps/details?id=net.openvpn.openvpn&pli=1
Step 2 – Import the Configuration File
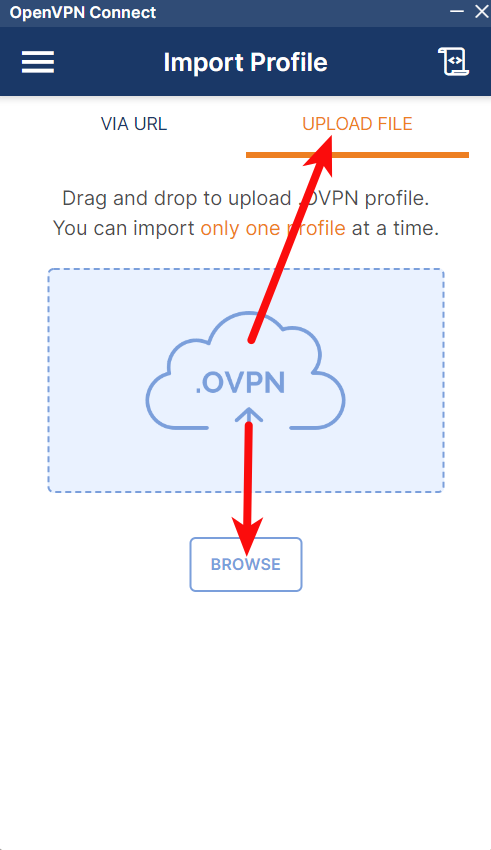
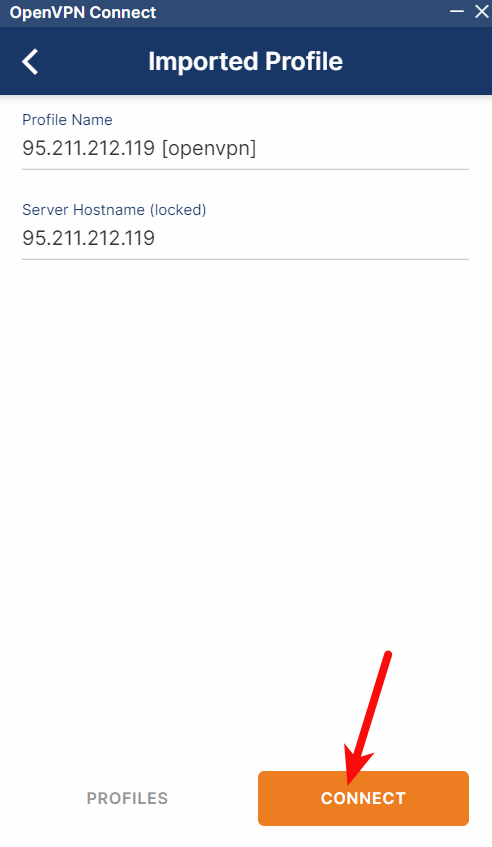
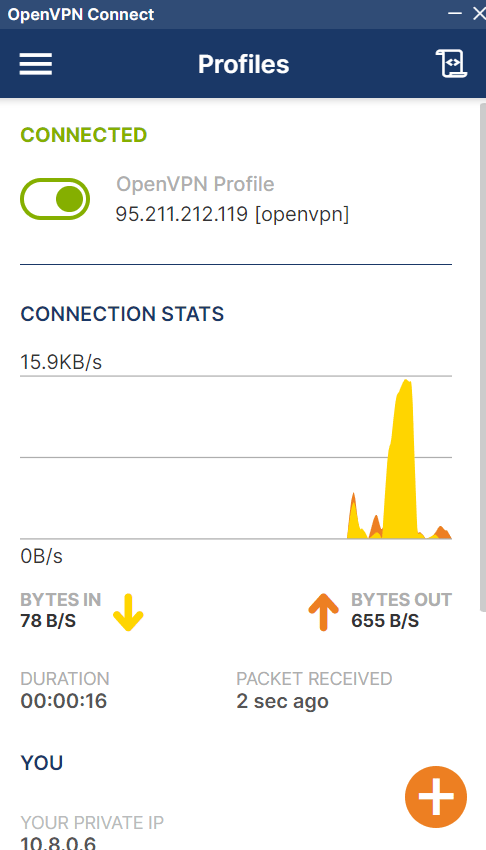
Start the OpenVPN Connect app and import the downloaded openvpn.ovpn file.
Step 3 – Verify the Connection
You can verify that OpenVPN works properly by checking your IP address at:
If the VPN is connected correctly, you should see your server IP address.
macOS
Step 1 – Install Tunnelblick
Download and install the stable version of Tunnelblick from:
Step 2 – Import the Configuration File
Right-click the downloaded openvpn.ovpn file and open it with Tunnelblick.
Tunnelblick should import the configuration automatically.
Step 3 – Connect to VPN
Click the Tunnelblick icon in the menu bar and select the imported configuration.

Step 4 – Verify the Connection
You can verify that OpenVPN works properly by checking your IP address at:
If the VPN is connected correctly, you should see your server IP address.
Linux
This section uses Ubuntu as an example, but the process is similar on most Linux distributions.
Step 1 – Install OpenVPN
Open a terminal and install the required package:
sudo apt install openvpn
Step 2 – Open the Download Folder
Go to the folder where the openvpn.ovpn file was downloaded.
For example, if it was downloaded to the Downloads folder, use:
cd ~/Downloads
Step 3 – Start OpenVPN
Start OpenVPN using the downloaded configuration file:
sudo openvpn openvpn.ovpn
When you see:
Initialization Sequence Completed
you are connected to OpenVPN.
To stop the connection, press CTRL-C.
Step 4 – Verify the Connection
You can verify that OpenVPN works properly by checking your IP address at:
If the VPN is connected correctly, you should see your server IP address.
Troubleshooting OpenVPN
If you receive any errors, first reinstall OpenVPN from the control panel in the Client Area, not on your local device.
After reinstalling OpenVPN, download a new configuration file using the Download File button for OpenVPN and import the new openvpn.ovpn file into your OpenVPN client.
After reinstalling OpenVPN, remove the old imported configuration from your OpenVPN client and import the newly downloaded configuration file.
If the problem still occurs after reinstalling OpenVPN and importing a new configuration file, please open a support ticket and provide your OpenVPN client logs.
Verification
If your IP address changes to your server IP address, OpenVPN is configured correctly and the VPN connection is working.
