Knowledgebase
Portal Home > Knowledgebase > How-to > Hosting > Other software > Prowlarr basic configuration
Prowlarr basic configuration
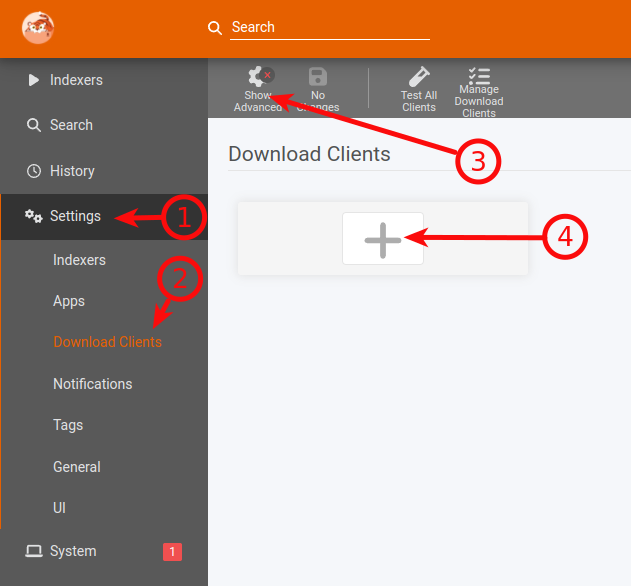
To configure download clients, go to settings -> Download Clients and enable advanced settings with button Show Advanced.
rTorrent
Name - name it as you wish
Enable - tick it
Host - your server hostname, can be found in the manager
Port - 443
SSL - tick it
Url Path - /username/rutorrent/plugins/httprpc/action.php - where the username is your service username
Username and Password - your service login details
Scroll down and click Test, if everything is OK then Save.
Deluge
Name - name it as you wish
Enable - tick it
Host - your server hostname, can be found in the manager
Port - 443
SSL - tick it
Url Base - /username/deluge - where the the username is your service username
Password - your service password
Category - it must be empty if Label plugin is not activated/configured in Deluge
Scroll down and click Test, if everything is OK then Save.
Transmission
Name - name it as you wish
Enable - tick it
Host - your server hostname, can be found in the manager
Port - 443
SSL - tick it
Url Base - /username/transmission - where the username is your service username
Username and Password - your service login details
Scroll down and click Test, if everything is OK then Save.
qBittorrent
Name - name it as you wish
Enable - tick it
Host - your server hostname, can be found in the manager
Port - 443
SSL - tick it
Url Base - /username/qbittorrent - where the username is your service username
Username and Password - your service login details
Scroll down and click Test, if everything is OK then Save.
NZBGet
Name - name it as you wish
Enable - tick it
Host - your server hostname, can be found in the manager
Port - 443
SSL - tick it
Url Base - /username/nzbget - where the username is your service username
Username and Password - your service login details
Category - must be empty if not configured in NZBGet
Scroll down and click Test, if everything is OK then Save.
SABnzbd
Name - name it as you wish
Enable - tick it
Host - your server hostname, can be found in the manager
Port - 443
SSL - tick it
Url Base - /username/sabnzbd - where the username is your service username
API Key - taken from SABnzbd, go to SABnzbd Config -> General, under Security you can find API Key
Username and Password - your service login details
Category - must be empty if not configured in SABnzbd
Scroll down and click Test, if everything is OK then Save.
To add applications go to Settings -> Apps.
Sonarr
Name - name it as you wish
Enable - tick it
Prowlarr Server - your full Prowlarr URL
Sonarr Server - your full Sonarr URL
API Key - taken from Sonarr, go to Sonarr Settings -> General, under Security you can find API Key
Scroll down and click Test, if everything is OK then Save.
Radarr
Name - name it as you wish
Enable - tick it
Prowlarr Server - your full Prowlarr URL
Radarr Server - your full Radarr URL
API Key - taken from Radarr, go to Radarr Settings -> General, under Security you can find API Key
Scroll down and click Test, if everything is OK then Save.
Readarr
Name - name it as you wish
Enable - tick it
Prowlarr Server - your full Prowlarr URL
Readarr Server - your full Readarr URL
API Key - taken from Readarr, go to Readarr Settings -> General, under Security you can find API Key
Scroll down and click Test, if everything is OK then Save.
Mylarr
Name - name it as you wish
Enable - tick it
Prowlarr Server - your full Prowlarr URL
Mylar Server - your full Mylar URL
API Key - taken from Mylar, go to Mylarr Settings -> Web Interface -> Enable API -> Generate key and then Save Changes
Scroll down and click Test, if everything is OK then Save.
Lidarr
Name - name it as you wish
Enable - tick it
Prowlarr Server - your full Prowlarr URL
Lidarr Server - your full Lidarr URL
API Key - taken from Sonarr, go to Lidarr Settings -> General, under Security you can find API Key
Scroll down and click Test, if everything is OK then Save.
![]() Add to Favourites
Add to Favourites  Print this Article
Powered by WHMCompleteSolution


